Categories
Categories
- Home
- Cake Decorating Tutorials-Recipes - Free
- Cake Decorating Instruction Essentials
Cake Decorating Instruction Essentials
Cake Decorating Instruction
Free Tutorials on cake decorating and how to use your cake decorating supplies.
3 Essentials of Decorating
Every decoration you make when piping is the result of three things working together:
Understand these three essentials and you'll get perfect decorating results!
------------------------------------------------------------------
Icing Consistency
If the consistency of your icing is not right, your decorations will not be right either. Just a few drops of liquid can make a great deal of difference in your decorating results. Many factors can affect icing consistency, such as humidity, temperature, ingredients and equipment. You may try using different icing consistencies when decorating to determine what works best for you. As a general guideline, if you are having trouble creating the decorations you want and you feel your icing is too thin, add a little more confectioner's sugar; if you feel your icing is too thick, add a little more liquid. In royal icing recipes, if adding more than 1/2 cup confectioner's sugar to thicken icing, also add 1-2 additional teaspoons of Meringue Powder.

Stiff icing is used for figure piping and stringwork and for decorations like roses, carnations and sweet peas with upright petals. If icing is not stiff enough, flower petals will droop. If icing cracks when piped out, icing is probably too stiff. Add light corn syrup to icing used for stringwork to give strings greater elasticity so they will not break.

Medium icing is used for decorations such as stars, shell borders and flowers with flat petals. If the icing is too stiff or too thin, you will not get the uniformity that characterizes these decorations.
![]()
Thin icing is used for decorations such as printing and writing, vines and leaves. Leaves will be pointier, vines will not break and writing will flow easily if you add 1-2 teaspoons light corn syrup to each cup of icing. Thin icing is used to ice cakes smooth. Begin with your prepared icing recipe, then add small amounts of the same liquid used in the recipe (usually milk or water) until the proper spreading consistency is reached.
------------------------------------------------------------------
Correct Bag Position
The way your decorations curl, point and lie depends not only on icing consistency but also on the way you hold the bag and the way you move it. Bag positions are described in terms of both angle and direction.
Angle refers to the position of the bag relative to the work surface. There are two basic angle positions, 90° (straight up) and 45° (halfway between vertical and horizontal).
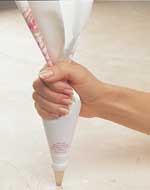
90° angle or straight up, perpendicular to the surface.
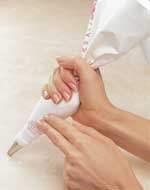
45° angle or halfway between vertical and horizontal.
Direction
The angle in relation to the work surface is only half the story on bag position. The other half is the direction in which the back of the bag is pointed.
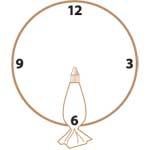
Correct bag direction is easiest to learn when you think of the back of the bag as the hour hand of a clock. When you hold the bag at a 45° angle to the surface, you can sweep out a circle with the back end of the bag by rolling your wrist and holding the end of the tip in the same spot. Pretend the circle you formed in the air is a clock face. The hours on the clock face correspond to the direction you point the back end of the bag.
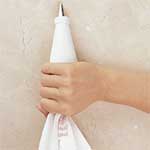
Back of bag at 6:00

Back of bag at 3:00
The technique instructions on Wilton.com will list the correct direction for holding the bag. When the bag direction differs for left-handed decorators, that direction will be listed in parentheses. For example, when a bag is to be held at 3:00 for a right-handed decorator, it should be held at 9:00 for a left-handed decorator.
One more thing...since most decorating tip openings are the same shape all the way around, there's no right side and wrong side up when you're squeezing icing out of them. However, some tips, such as petal, ruffle, basketweave and leaf have irregularly shaped openings. For those you must watch your tip position as well as your bag position. If the tip opening must be in a special position, the instructions will tell you.
------------------------------------------------
Pressure Control

In addition to having the proper icing consistency and the correct bag position, you'll need to master three types of pressure control: heavy, medium and light. The size and uniformity of your icing designs are affected by the amount of pressure you apply to the bag and the steadiness of that pressure. (In other words, how you squeeze and relax your grip on the decorating bag.) Your goal is to learn to apply pressure so consistently that you can move the bag in a free and easy glide while just the right amount of icing flows through the tip. Practice will help you achieve this control.
Portions of text and images courtesy of Wilton Industries, Inc. Used with permission.
![]()
 Loading... Please wait...